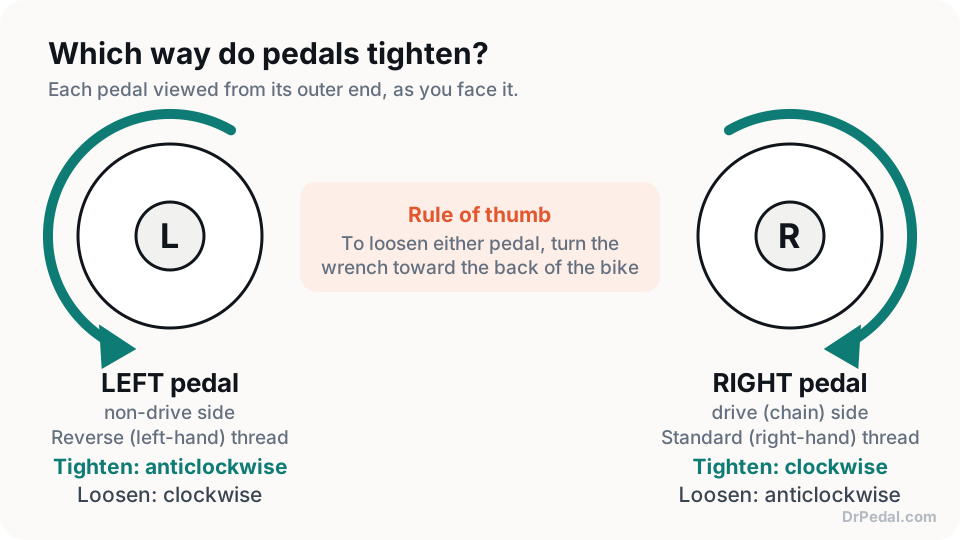
To remove bike pedals, fit a 15 mm pedal wrench on the spindle flats, or a 6 mm or 8 mm hex key into the spindle end from behind the crank, and turn the top of the tool toward the back of the bike on both sides. The left pedal is reverse-threaded, which is why that one rule covers both. If a pedal is stuck, try better leverage, penetrating oil and time before anything harsher, and stop if the tool starts to round the fitting.
Independent & reader-supported. DrPedal doesn't sell anything. If you buy through our Amazon links we may earn a commission at no extra cost to you — as an Amazon Associate we earn from qualifying purchases. How we make money.
Tools worth having for pedal removal
Chosen on compatibility, specs and design — not sponsored. Amazon buttons open a search for the exact model.
Best for: Pedals with 15 mm wrench flats, swapped a few times a year
A dedicated 15 mm pedal wrench with a thin head that seats fully on narrow pedal flats, which a standard spanner often can't. The handle is long enough for a normally tightened pedal.
Best for: Road and flat pedals with an 8 mm hex socket and no wrench flats
A single-size, long-handled hex wrench gives far more leverage than a folding multi-tool. Check that your pedal takes 8 mm and not 6 mm before you buy.
Removing pedals takes five minutes when the threads were greased, and a lot longer when they were not. A little setup makes either case easier and safer.
Support the bike. A workstand is ideal. Without one, stand the bike on its wheels against a wall or have someone hold it, so it can’t tip when you push.
Shift to the big chainring. On the drive side, the chain then covers the teeth, so a slipping wrench doesn’t drive your knuckles into them.
Wear gloves if you have them. A wrench that lets go next to a chainring is the classic way to cut a hand.
Have a rag and grease ready. Threads should be cleaned and protected as soon as the pedal is out.
Which tool fits your pedals: 15 mm wrench or 6/8 mm hex
Look at the pedal before reaching for a tool. Pedals have one of two fittings, and many have both.
What you see
Tool
Common on
Two parallel flats on the spindle, between the pedal body and the crank
15 mm pedal wrench
Most stock and budget pedals, many flat and SPD pedals
A hex socket in the spindle end, seen from behind (inside) the crank arm
6 mm or 8 mm hex key
Many lightweight road pedals and slim flat pedals
Both flats and a hex socket
Either; the pedal wrench usually gives more leverage
Many mid-range clipless and flat pedals
Flats on an old pedal that a 15 mm wrench won’t fit
9/16” pedal wrench
Some older and vintage pedals
A few habits stop tools from slipping:
Size the hex by feel. Try 8 mm first; if it rattles in the socket, use 6 mm. A key that wobbles will round the socket under load.
Use a real pedal wrench on flats. The flats are narrow and sit tight against the crank. A normal combination spanner is often too thick to seat fully and too short for a tight pedal.
Skip multi-tools and adjustable wrenches. Short levers and loose jaws are how pedal fittings get rounded.
Turn the top of the tool toward the back of the bike to loosen either pedal. The right (drive-side) pedal has a normal thread and loosens counterclockwise; the left pedal is reverse-threaded and loosens clockwise, viewed from its own side.
The right pedal tightens clockwise; the left pedal is reverse-threaded and tightens counterclockwise.
Why the left side is reversed, and how to tell L from R when the markings have worn off, is covered in which pedal is reverse threaded.
How to remove pedals from a bike, step by step
Find the markings. Most pedals have an R or L on the spindle or body. The right pedal is on the chainring side. Work on one side at a time.
Position the crank. Turn the crank so the arm you are working on points forward and level.
Seat the tool fully. Push a pedal wrench all the way onto the flats, with the handle pointing roughly up. With a hex key, insert it from behind the crank right to the bottom of the socket and use the long end as the handle.
Stop the crank turning. Hold the crank arm with your free hand, or grip the wrench and crank arm together (the squeeze method below). Otherwise the crank just spins backward.
Push toward the back of the bike with a short, firm effort. A greased pedal usually breaks free with a crack and then turns easily.
Spin it out fast. Once it’s loose, hold the wrench still and turn the cranks backward. Pedaling forward is the tightening direction on both sides, so backpedaling unscrews the pedal. Finish by hand.
Catch the pedal and any washer. Keep a pedal washer with its own pedal and side.
Repeat on the other side. The direction rule doesn’t change: top of the tool toward the back.
How to remove a stuck bike pedal
A stuck bike pedal is almost always one of three things: corrosion between a steel spindle and an aluminum crank, a pedal that was overtightened, or a pedal being turned the wrong way. Work through the steps below in order and stop at the first one that works.
1. Rule out the wrong direction
Check again before adding force. Most “seized” left pedals are being tightened. Top of the tool toward the back of the bike: clockwise on the left, counterclockwise on the right.
2. Get better leverage
Squeeze method: with the crank forward and level, fit the wrench pointing up and slightly back so the wrench and crank arm form a narrow V. Grip both and squeeze them together. Your hands push against each other, so the crank can’t spin and nothing needs holding.
A longer tool: a long pedal wrench or long hex wrench multiplies your effort without the risks of an improvised extension.
3. Penetrating oil and time
Spray penetrating oil where the spindle enters the crank, from the outside and from behind the crank, then leave it for several hours or overnight. Reapply once or twice. A tiny nudge in the tightening direction before you loosen can help crack the corrosion.
4. Shock instead of strain
With the wrench fitted and pre-loaded, give the end of the handle a sharp blow with a rubber mallet. Corrosion often lets go under a sudden load that steady pressure won’t break.
5. The crank-arm-on-the-floor method
If the crank arm is easy to remove (the left arm on most two-piece road and mountain cranks is), take it off following the crank maker’s instructions. Lay it flat on the floor on a piece of cardboard, pedal pointing up, and pin the arm under your foot or knee close to the pedal. Now both hands can work the wrench, and the arm can’t move or spring back.
Looking down at the pedal end, the right pedal loosens counterclockwise and the left clockwise. A bench vise with soft jaws gripping the crank arm, never the pedal, does the same job. Refit the arm to the crank maker’s procedure and torque afterward.
6. Heat: last resort, with caution
Gentle heat on the crank’s pedal boss can break a corrosion bond, because aluminum expands more than steel. It comes with real risks:
Never heat a carbon crank or any crank with a bonded thread insert.
Penetrating oil is flammable. Wipe it off first, and never use an open flame near it.
Heat ruins finishes and pedal internals. Paint, anodizing, seals, grease and plastic parts all suffer, so expect to rebuild or replace the pedal.
Use a heat gun, not a torch, and stop well short of discoloring the metal.
Most home mechanics are better off taking a pedal that needs heat to a bike shop.
When to stop
Stop and hand it over if the flats or hex socket start to round, the crank is carbon, the crank arm flexes alarmingly, or the tool itself starts to bend. A shop has longer tools, a sturdy vise and thread-repair taps if the crank threads come out damaged.
What not to do
Don’t slip a pipe over a short hex key. The key twists, cams out and rounds the socket, which removes your best way in.
Don’t grip the pedal body with pliers. The body spins on its bearings, so it can’t turn the spindle; you’ll only wreck the pedal.
Don’t hammer the spindle end or pedal body. It damages the bearings and can mushroom the threads.
Don’t stand on a pedal wrench on a free-spinning crank. If the crank turns or the pedal lets go, you fall toward the chainring.
Don’t keep going once the fitting starts to round. A rounded fitting turns a shop job into a drilling job.
Don’t force a pedal back in. If it won’t thread by hand, it’s on the wrong side or cross-threaded.
After removal: check the threads
Wipe both threads clean with a rag, using a brush and degreaser if they’re gritty. Then look closely:
Crank threads: flattened, torn or shiny-smeared threads need attention before a pedal goes back in. Light damage can be cleaned up with a pedal tap; badly stripped threads need an insert or a new crank arm.
Pedal spindle: a pedal that wobbled before removal may have a bent spindle; see pedal spindles for checks and replacements.
Bearings: with the pedal in your hand, spin the body. If it feels gritty or rocks on the spindle, now is the time for pedal bearing service.
Reinstalling pedals
Refit is the reverse, with grease and patience:
Grease the pedal threads with a bicycle grease from our grease and lube guide, or anti-seize on titanium spindles.
Fit the maker’s washer if your crank or pedal came with one.
Start by hand, turning toward the front of the bike. The pedal should run in for several full turns without resistance.
Tighten with the wrench or hex key. Use the pedal maker’s torque if you have a torque wrench; Shimano, for example, specifies 35–55 N·m. Without one, tighten firmly but don’t stand on the wrench.
Recheck after the first ride.
Adult bikes almost all use 9/16” pedal threads; one-piece cranks on many kids’, BMX and cruiser bikes use 1/2”. Check pedal thread sizes before buying new pedals, and see how to install clipless pedals and cleats if you’re switching systems.
FAQ
Which way do you turn to remove bike pedals?
+
Turn the top of the tool toward the back of the bike on both sides. The right pedal loosens counterclockwise and the left pedal, which is reverse-threaded, loosens clockwise when viewed from its own side. Full detail in which pedal is reverse threaded.
Can you remove bike pedals without a pedal wrench?
+
Yes, if the pedal has a hex socket in the spindle end: use a long 6 mm or 8 mm hex key from behind the crank. A thin 15 mm spanner sometimes fits the flats, but adjustable wrenches and thick spanners tend to slip and round them.
Why is my bike pedal so hard to remove?
+
Usually because it went in dry. A steel spindle in an aluminum crank corrodes into the threads over time unless the threads were greased. Overtightening and turning the left pedal the wrong way are the other common causes.
Does WD-40 help remove a stuck pedal?
+
It can help, but a dedicated penetrating oil is the better choice. Apply it from both sides of the crank, give it hours rather than minutes, and clean and re-grease the threads once the pedal is out.
Can I remove pedals from a carbon crank the same way?
+
Yes. The pedal threads into a metal insert in the crank, so the tool and direction are the same. Never use heat or hammer blows on a carbon crank; if the pedal will not move with normal leverage, take it to a bike shop.
How do I take pedals off a kids' bike?
+
The same way. Most kids' and BMX bikes with one-piece cranks use 1/2" pedals that still take a 15 mm wrench, and the left pedal is still reverse-threaded. See pedal thread sizes before buying replacements.