To service pedal bearings, take the pedal off the bike, remove the spindle (through the end cap and axle nut on most flat and Crankbrothers-style pedals, or by unthreading the axle unit from the crank side of the body on Shimano pedals), clean out the old grease, replace worn bushings, seals or bearings, then regrease and reassemble so the pedal turns smoothly with no play. Do it when a pedal feels rough, gritty or loose, not on a fixed schedule. If the spindle is bent or no parts exist for your model, replace the pedals instead.
Independent & reader-supported. DrPedal doesn't sell anything. If you buy through our Amazon links we may earn a commission at no extra cost to you — as an Amazon Associate we earn from qualifying purchases. How we make money.
The one supply every pedal rebuild needs
Chosen on compatibility, specs and design — not sponsored. Amazon buttons open a search for the exact model.
Best for: Repacking cup-and-cone, bushing and cartridge-bearing pedals at home
A polyurea bearing grease that Park Tool rates NLGI Grade 2, with a -34°C to 245°C working range. One tube covers plenty of pedal rebuilds, plus the pedal threads when you refit them.
Service pedal bearings when they feel rough, make noise or develop play. Two quick checks tell you, with the pedals still on the bike.
Spin test: hold the crank still and turn the pedal body slowly with your fingers. It should feel smooth and even. Grinding, notchiness or a gritty feel means dirty or damaged bearings.
Play test: grip the crank arm with one hand and the pedal body with the other, then rock the body up and down and in and out along the spindle. Any knock or clunk is play. Holding the crank arm rules out a loose pedal thread or bottom-bracket play.
Other signs: a creak or click under load that remains after you have greased the pedal threads and checked the cleats, or water squeezing out of the pedal after a wet ride.
Don’t worry if a healthy pedal stops after a turn or two. Many pedals use contact seals that drag on purpose. A pedal that spins for ages may simply have worn seals.
Know your pedal’s bearing type
The way the spindle runs inside the body decides how you service it. Look up your model, or check the outer end of the pedal: an end cap usually means an axle nut underneath; no cap and a plastic or splined collar on the crank side usually means a Shimano-style axle unit.
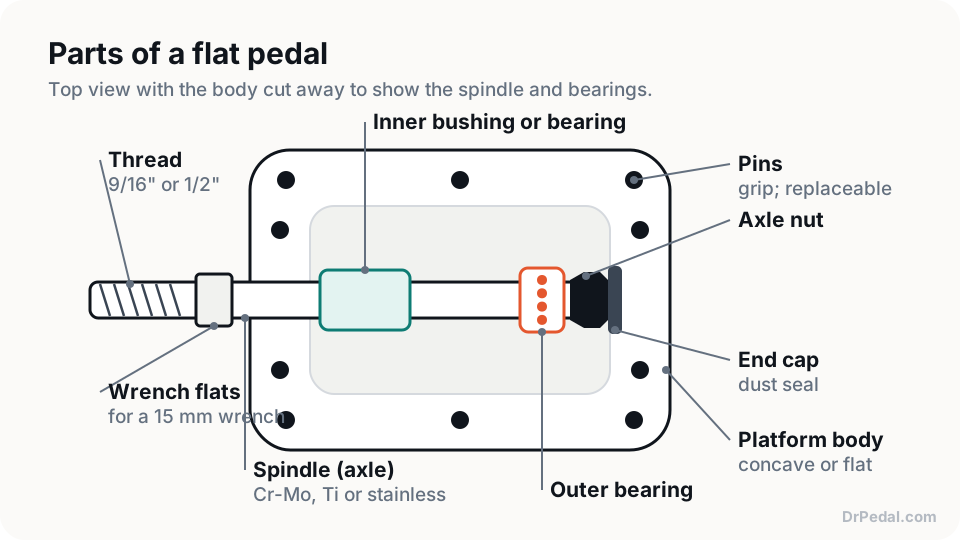
A typical flat pedal: inner bushing near the crank, outer bearing under the axle nut and end cap.
Bearing type
How it works
Typical pedals
Service
Cup-and-cone (loose balls)
Loose balls run between a cup and an adjustable cone, locked by a nut
Most Shimano SPD and SPD-SL pedals, MKS pedals
Clean, regrease and adjust preload; Shimano also sells complete axle units
Cartridge bearing plus bushing
A sealed bearing at the outer end and a bushing near the crank
Crankbrothers pedals, many flat pedals
Replace bushing, bearing and seals from the maker’s kit
Plain DU bushings
Steel-backed sleeves with a low-friction lining, no balls
DMR V8 Classic DU (two DU bushings)
Clean, regrease, replace bushings from the service kit
Multiple sealed cartridge bearings
Two or more sealed bearings, sometimes with a needle bearing
Many premium flat pedals
Repack or replace bearings with a puller and press
Molded plastic bushings
Spindle runs straight in the body or a plastic sleeve
This covers most flat pedals and Crankbrothers-style clipless pedals, where an axle nut at the outer end holds the body on the spindle. Check your pedal’s service instructions for the axle nut’s thread direction, because it isn’t the same on every pedal.
Remove the pedal from the crank.
Clamp the spindle flats in a soft-jawed vise, pedal body up. Clamping the flats, not the threads, protects the crank thread.
Remove the end cap at the outer end of the body. Plastic caps strip easily, so seat the tool fully.
Undo the axle nut with a thin-walled socket.
Slide the body off the spindle. Lay the washers, seals, bushings and bearings out in order, or photograph them before they come apart.
Clean every part with degreaser and a rag, then dry them.
Inspect: the spindle should be straight and smooth where the bushing runs; the bushing shouldn’t be scored or oval; seals shouldn’t be torn; a cartridge bearing should turn smoothly with no play.
Replace worn parts from the kit. Press cartridge bearings in on the outer race with a press or a socket of the right size, never by hammering on the inner race.
Grease generously: coat the bushing and spindle, and pack the body cavity. Spare grease acts as an extra seal against water.
Reassemble in order, fit the nut and tighten it to the maker’s figure. If no figure is given, stop at snug.
Refit the end cap with a smear of grease on its seal, then check spin and play before fitting the pedal.
How to service a Shimano-style axle unit
Most Shimano SPD and SPD-SL pedals use an axle unit that unthreads from the crank side of the body as one piece. Park Tool notes that the axle unit’s thread runs opposite to the pedal’s crank thread and that the direction is marked on the unit, so read the arrow before you turn anything.
Hold the pedal body gently in a soft-jawed vise or a workstand clamp.
Unthread the axle unit with Shimano’s splined tool (TL-PD40 fits many models) or the wrench flats on the lock bush, turning the direction marked on the unit.
Pull the axle unit out and wipe the old grease out of the body cavity.
Quick service: if the unit spins smoothly with no play, pack the body cavity with fresh grease, push the unit back in and thread it home. Grease is pushed back through the bearings as the unit goes in.
Full service: for a rough or loose unit, hold the cone with a thin wrench, undo the lock nut and remove the cone. Catch every ball and count them. Clean the balls, cone and cup, look for pitting, regrease, refit the balls and set the preload (below).
Thread the unit back in by hand, then tighten until snug, following your pedal’s dealer manual if it gives a figure.
If the cones or cups are pitted, or the spindle is bent, order the complete axle unit for your exact model number rather than rebuilding it.
Setting bearing preload
Preload is how tightly the bearing is adjusted. Too loose and the pedal knocks and wears the races; too tight and it binds and wears just as fast.
Cup-and-cone: turn the cone in until the play just disappears, hold it with the cone wrench and tighten the lock nut against it. Locking usually adds a little preload, so start a touch loose. Then check: rock the spindle for play and turn it slowly for roughness. Repeat until it has neither.
Cartridge bearing plus bushing: the axle nut clamps the bearing’s inner race, so there’s no adjustment as such. If the pedal binds once the nut is tight, check that every washer and spacer went back in the original order.
Sealed multi-bearing pedals: same as above. Persistent notchiness after reassembly means a damaged bearing, not a preload problem.
Choosing grease for pedal bearings
Use a bicycle bearing grease of medium consistency. NLGI Grade 2 is the common choice: thick enough to stay in the bearing, soft enough not to drag.
All-round:Park Tool PolyLube 1000 suits cup-and-cone, cartridge and bushing pedals, and the pedal threads too.
Wet riding: pick a grease sold as highly water resistant; the grease and lube guide compares them.
Not in bearings: chain lube, spray lubricants, water-displacing sprays and anti-seize. Anti-seize belongs on titanium spindle threads only.
Rebuild kit or new pedals?
Rebuild when the spindle is straight, the body is sound and the maker sells parts for your model. Replace when any of those is missing.
Situation
Better choice
Rough or gritty, spindle straight, parts available
Clean and regrease, or fit a rebuild kit
Play from a worn bushing or bearing
Rebuild kit
Shimano cup-and-cone with pitted cones or cups
Complete axle unit for that model
Bent spindle with no spare spindle offered
New pedals
Cracked body, or stripped pin holes as well
New pedals
Budget pedal with molded bushings and no parts
New pedals
Kits are model- and generation-specific, so match the kit to the name on the pedal. If you’re replacing worn pins at the same time, see how to replace pedal pins. If you decide on new pedals instead, our flat pedals and clipless pedals guides list current models with service parts.
FAQ
How often should you service pedal bearings?
+
When they tell you to: roughness, grinding, a knock or side-to-side play. Check them every few months by spinning and rocking each pedal, and sooner after a wet winter or if you pressure-wash your bike.
Can you regrease sealed pedal bearings?
+
Often, yes. Lift the rubber seal gently with a pick, flush out the old grease, pack in fresh grease and press the seal back. If the bearing still feels rough after cleaning, replace it.
Why doesn't my pedal spin freely?
+
Many pedals have contact seals that drag on purpose to keep water out, so a pedal that stops after a turn or two can be perfectly healthy. Roughness, notchiness or play are the real warning signs. A pedal that is stiff after a rebuild usually has its preload set too tight.
What grease should I use on pedal bearings?
+
A bicycle bearing grease of medium (NLGI 2) consistency, such as Park Tool PolyLube 1000. Choose a more water-resistant grease if you ride in constant wet. Don't use chain lube, spray lubricants or anti-seize in bearings.
Is a pedal rebuild kit worth it?
+
Yes, for good pedals where the maker sells a kit for your exact model and the spindle is straight. For budget pedals with no spare parts, or pedals with a bent spindle or cracked body, new pedals are the better answer.
What causes play in a bike pedal?
+
A worn bushing, a loose cone or axle nut, or a worn cartridge bearing. First check the play isn't coming from a loose pedal thread or a worn bottom bracket by holding the crank arm while you rock the pedal.