Which bike pedal is reverse threaded?
The left (non-drive-side) pedal is reverse-threaded: it loosens clockwise and tightens counterclockwise (anticlockwise). The right (drive-side) pedal uses a normal thread.
| Pedal | Side of the bike | Thread | To loosen | To tighten |
|---|---|---|---|---|
| Right | Drive side (chainring side) | Normal, right-hand | Counterclockwise | Clockwise |
| Left | Non-drive side | Reverse, left-hand | Clockwise | Counterclockwise |
Directions in the table are as seen from that side of the bike, looking at the end of the pedal. “Left” and “right” are as if you were sitting on the bike.
The easy rule: turn toward the back of the bike to loosen
You do not need to remember clockwise or counterclockwise. On both sides:
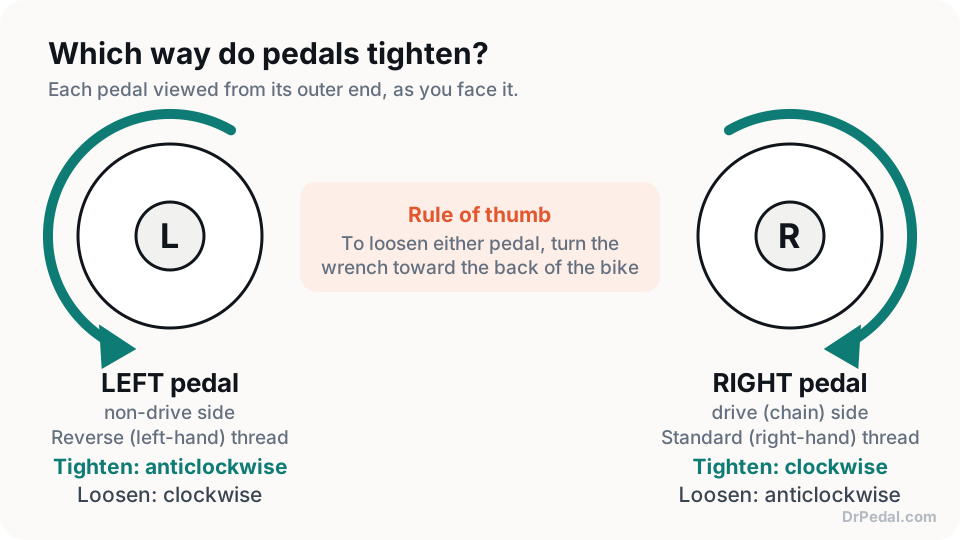
- Loosen: move the top of the wrench toward the back of the bike.
- Tighten: move the top of the wrench toward the front of the bike.
Another way to remember it: pedaling forward is the tightening direction for both pedals. When you thread a pedal in by hand, you are turning it the same way the wheel rolls forward.
This rule also works when you use a hex key from behind the crank arm, where clockwise and counterclockwise look reversed because you are viewing the pedal from the other side.
How to tell left and right pedals apart
Most pedals are marked, and the threads themselves give it away if the marks have worn off.
- Letters: look for L and R stamped on the spindle end, the wrench flats or the pedal body.
- Grooves: some makers machine a groove or notches on the left spindle as a second marker.
- Thread direction: hold the pedal with the spindle pointing up. On the right pedal the threads rise toward the right; on the left pedal they rise toward the left.
- Test fit: a pedal on its correct side will turn in easily by hand for several turns. If it binds after a turn, stop: it is probably the wrong side or cross-threaded.
Why the left pedal is reverse threaded
The left pedal is reverse-threaded so that pedaling keeps it tight instead of unscrewing it. The cause is an effect called precession.
The spindle never fits its threaded hole perfectly. As you pedal, the load pushes the spindle against one side of the hole, and that contact point travels around the spindle with every revolution. The rolling motion slowly turns the spindle within the crank, like a ring rolling around inside a slightly larger hole.
On the left side, that rolling would gradually unscrew a normal thread. Giving the left pedal a reverse thread means precession tightens both pedals. That is also why a loose pedal should be fixed at once: a pedal that is not fully tight can work back and forth and damage the crank threads.
Tools you need
Removing and fitting pedals needs only a few tools:
- A 15 mm pedal wrench for pedals with wrench flats. It is thinner and longer than a normal spanner.
- A 6 mm or 8 mm hex key for pedals with a hex socket in the spindle end (many have both fittings).
- Grease for the threads, or anti-seize for titanium spindles.
- A rag to clean the threads.
- A torque wrench with a 15 mm crowfoot or hex bit (optional, but useful on carbon cranks).
- Penetrating oil if the pedals have been in for years.
Compare the options in our guide to pedal removal tools.
How to remove bike pedals
- Shift to the big chainring so the teeth cover your knuckles on the drive side.
- Fit the tool: a 15 mm pedal wrench on the flats between the pedal and the crank, or a hex key into the spindle end from behind the crank.
- Position the crank so the arm you are working on points forward and horizontal.
- Turn toward the back of the bike. Right pedal: counterclockwise. Left pedal: clockwise.
- Use the squeeze method if it is tight: with the wrench pointing up and slightly back, squeeze the wrench toward the crank arm. This gives leverage without the crank spinning.
- Spin it out by hand once it breaks free, supporting the pedal so it does not drop.
- Clean both threads with a rag and check them for damage before fitting new pedals.
How to install bike pedals
- Match the sides. The pedal marked R goes on the chainring side; L goes on the left.
- Clean the threads in the crank and on the pedal.
- Grease the pedal threads with a thin coat of bike grease, or anti-seize for titanium spindles.
- Fit a pedal washer if your crank maker supplies one; see pedal washers.
- Start by hand, turning toward the front of the bike (right pedal clockwise, left counterclockwise). It should turn easily for several full turns. If it binds, back it out and start again.
- Tighten with the pedal wrench or hex key, ideally to the maker’s torque figure.
- Re-check after the first ride, and again after the first few rides on new pedals.
How tight should pedals be?
Use the pedal maker’s torque figure. Shimano, for example, specifies 35–55 N·m (about 26–41 lbf·ft) for its pedals in its dealer manuals. That is much more than a stem or seatpost bolt, so a small torque wrench will not reach it.
Without a torque wrench, tighten firmly with a full-length pedal wrench, using a steady push rather than your full body weight. Because precession keeps correctly fitted pedals tight, you do not need to over-tighten them, and over-tightening makes them harder to remove later.
How to remove a stuck pedal
A stuck pedal usually needs better leverage and time, not more violence. Work through this in order:
- Double-check the direction. Most “seized” pedals are being turned the wrong way, especially the left one.
- Use a longer tool: a long pedal wrench or a long hex wrench, not a multi-tool.
- Use the squeeze method described above, with the crank forward and the wrench pointing up and slightly back.
- Apply penetrating oil to the joint from both sides of the crank and leave it for a few hours or overnight.
- Tap the wrench handle with a rubber mallet to break the corrosion.
- Stop if the flats or hex start to round, or if the crank is carbon. A bike shop has longer tools and more ways to remove it without damaging the crank.
Grease or anti-seize on pedal threads?
Always use one or the other. A steel spindle in an aluminum crank can corrode together over time, and a thin film on the threads prevents it, helps the pedal tighten fully and stops creaks.
- Steel spindles: a bicycle grease such as Park Tool PolyLube 1000.
- Titanium spindles: anti-seize, because titanium can gall (cold-weld) in the threads.
- Thread-locker: not needed. Thread direction already keeps pedals tight.
9/16” vs 1/2” pedal threads
There are two common pedal thread sizes, and they are not interchangeable.
| Thread | Used on | How to spot it |
|---|---|---|
| 9/16” x 20 TPI | Almost all adult bikes with three-piece cranks (road, mountain, hybrid, gravel) | Thread about 14.3 mm across |
| 1/2” x 20 TPI | One-piece cranks on many kids’, BMX and cruiser bikes | Thread about 12.7 mm across; the crank is one curved steel piece running through the frame |
Both sizes follow the same rule: the left pedal is reverse-threaded. Some vintage French bikes used a different metric pedal thread (14 x 1.25 mm), so check before buying pedals for an old French frame. When you shop, pedal listings state the thread; most clipless pedals and flat pedals are 9/16”.
Stripped crank threads: helicoils and thread inserts
A stripped crank thread can often be repaired. The usual causes are cross-threading, fitting a pedal on the wrong side, or riding with a loose pedal.
- Light damage: a bike shop can clean up the threads with a pedal tap (left-hand for the left crank).
- Stripped threads in an aluminum crank: the shop drills and taps the hole oversize and fits a threaded insert, either a helicoil-style coil or a solid bushing, which restores a standard 9/16” thread. Done properly, this is a durable repair.
- Carbon cranks: ask the crank maker. The threaded insert is bonded into the carbon, so the usual answer is a new crank arm.
- Badly damaged or cracked arms: replace the crank arm.
Do not try to force a pedal into damaged threads; it will strip the rest and can pull out while you ride.
FAQ
Which way do you unscrew a left bike pedal?
Clockwise, viewed from the left side of the bike. It is reverse-threaded, so it loosens the opposite way to a normal bolt. Turning the top of the wrench toward the back of the bike always loosens.
Is the right pedal reverse threaded?
No. The right (drive-side, chainring-side) pedal has a normal right-hand thread: counterclockwise to loosen, clockwise to tighten.
What happens if you put the pedals on the wrong sides?
They will not thread in by hand, because the thread directions do not match. Forcing them strips the crank's threads, which usually means a thread repair or a new crank arm. Check the L and R markings first.
Are all left bike pedals reverse threaded?
On virtually every modern bike, yes, for both 9/16" and 1/2" pedals. The right pedal is always the normal thread.
Can I swap a pedal from one side to the other?
No. Each pedal's spindle is threaded for its own side. If you lose or damage one, you need the correct left or right replacement.