To install clipless pedals, grease the threads, screw the R pedal clockwise into the drive-side crank and the L pedal counterclockwise into the left crank, then tighten firmly (Shimano specifies 35–55 N·m). To install cleats, put the cleat's center under the ball of your foot, match its angle to your natural foot angle, start it centered side to side, and tighten to the maker's torque: 5–6 N·m for Shimano SPD and SPD-SL cleats. Test on a trainer before you ride in traffic.
Independent & reader-supported. DrPedal doesn't sell anything. If you buy through our Amazon links we may earn a commission at no extra cost to you — as an Amazon Associate we earn from qualifying purchases. How we make money.
Tools for the job
Chosen on compatibility, specs and design — not sponsored. Amazon buttons open a search for the exact model.
A 15 mm pedal wrench with a thin head that slips between the pedal body and the crank, and a handle long enough for normal fitting and removal. Hex-only pedals need a 6 mm or 8 mm hex key instead.
Most of this is already in a home toolbox. Pedals and cleats usually come together in the box; if not, check the pairing in our cleat compatibility chart.
A 15 mm pedal wrench, or a 6 mm or 8 mm hex key for pedals with a socket in the spindle end. See pedal tools.
Grease for the threads, or anti-seize for titanium spindles. Any bike grease works.
A 4 mm hex key for Shimano SPD and SPD-SL cleat bolts. Check your own cleat bolts: some Look and Speedplay hardware takes a different key or a screwdriver.
A torque wrench and a small torque driver, if you have them.
Masking tape, a marker pen and a ruler for marking cleat position.
How to install clipless pedals
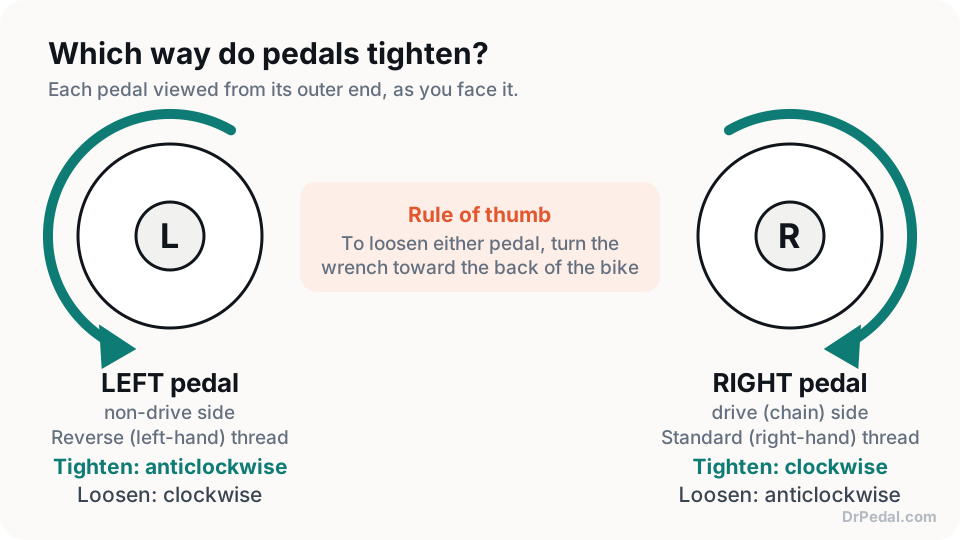
Clipless pedals fit exactly like any other pedal: the right pedal has a normal thread and the left pedal is reverse threaded.
The right pedal tightens clockwise; the left pedal is reverse threaded and tightens counterclockwise.
Identify left and right. Look for L and R on the spindle or wrench flats. R goes on the drive (chainring) side.
Clean the crank threads with a rag and check them for damage.
Grease the pedal threads with a thin coat. If your crank maker supplies a pedal washer, fit it now.
Start each pedal by hand. Right pedal clockwise, left pedal counterclockwise: on both sides, that is turning toward the front of the bike. It should spin in easily for several turns. If it binds, back it out and start again straight.
Tighten with the wrench or hex key. Set the crank horizontal and push the top of the tool toward the front of the bike.
Recheck after the first ride.
How tight should clipless pedals be?
Use the pedal maker’s figure. Shimano specifies 35–55 N·m for its pedals, much more than a stem bolt, so a small torque wrench will not reach it. Without a torque wrench, tighten firmly with a full-length pedal wrench and a steady push, not your body weight.
Pedals that are fitted correctly stay tight on their own, so there is no need to over-tighten them or use thread-locker. For stuck old pedals and thread repairs, see which pedal is reverse threaded.
Check your shoe and cleat first
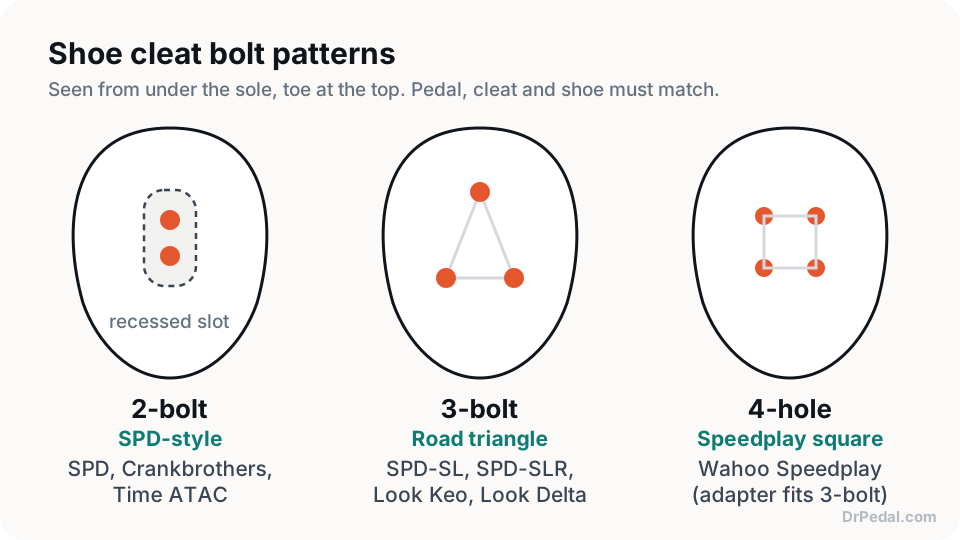
Your shoe’s bolt pattern has to match the cleat before position matters at all.
2-bolt (SPD, Crankbrothers), 3-bolt (SPD-SL, Look Keo, Look Delta) and 4-hole (Speedplay) soles.
2-bolt (SPD, Crankbrothers): remove any rubber or plastic cover over the cleat slot. The bolts thread into a sliding nut plate inside the sole; if it has shifted, lift the insole and center it under the slots.
3-bolt (SPD-SL, SPD-SLR, Look Keo, Look Delta): the bolts thread into inserts molded into the sole. Use the bolts that came with the cleats, because bolts that are too long can push into the footbed.
4-hole (Speedplay): standard road shoes use the 3-hole adapter supplied with Wahoo Speedplay cleats. Follow Wahoo’s instructions for the order of the plates.
Put the shoe on and feel for the bony bump behind your big toe, and the one behind your little toe. Together they are the ball of the foot.
Mark both on the side of the shoe with tape and a pen.
Take the shoe off and draw a line across the sole between the two marks.
How to install cleats: position step by step
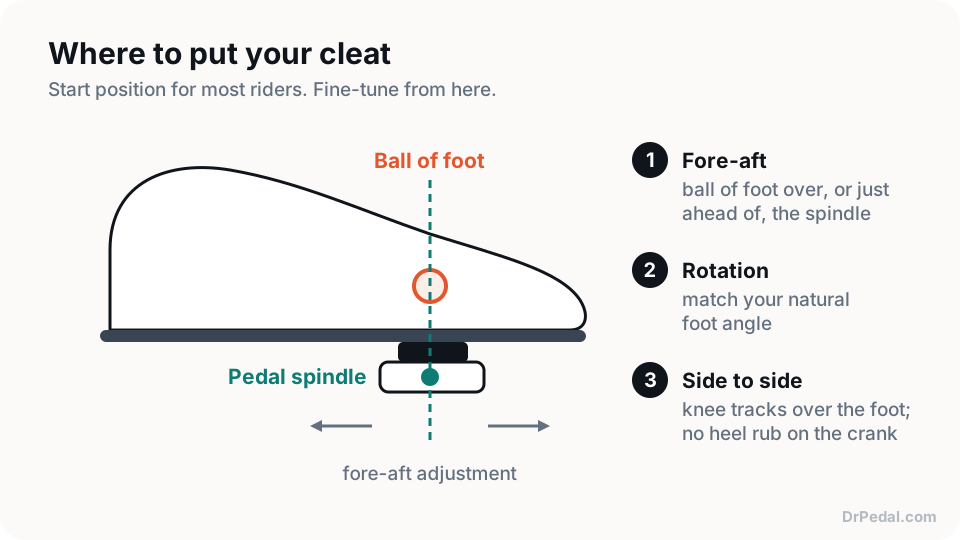
Set the cleat in three directions (fore-aft, rotation, side to side), then torque it. Work on one shoe, then copy it to the other.
1. Fore-aft: ball of the foot over the spindle
The standard starting point puts the ball of the foot directly over, or just in front of, the pedal spindle. Line the cleat’s center up with your ball-of-foot line, or a little behind it. Many road cleats have a mark on the side that shows where the pedal axle sits.
Start with the ball of the foot over the pedal spindle, then fine-tune.
Bike fitters often move the cleat slightly back for riders who get hot spots or numb toes. Make changes a couple of millimeters at a time.
2. Rotation: copy your natural foot angle
Sit on a table with your legs hanging and look down: most feet point slightly outward. Angle the cleat so the shoe points the same way on the pedal. If you are unsure, start with the cleat straight and let float absorb small errors.
After a ride, check where your heel sits. If it keeps pressing against one end of the float, rotate the cleat so your foot rests in the middle. Our guide to cleat float covers how much movement each cleat allows.
3. Side to side: stance width
Start with the cleat centered on the sole. Moving the cleat toward the inside edge of the shoe moves your foot outward on the pedal, and the reverse. Adjust if your heel or ankle brushes the crank, or if your knee tracks well inside or outside your foot.
4. Snug, check, then torque
Grease the bolt threads lightly so they do not seize in the nut plate or inserts.
Snug the bolts just enough that the cleat holds but can be tapped into place. Shimano’s SPD instructions call for a provisional 2.5 N·m at this stage.
Check the position against your marks.
Tighten in two or three passes, alternating bolts so the cleat seats evenly. Shimano specifies 5–6 N·m for SPD and SPD-SL cleat bolts.
For other cleats, use the figure in the cleat instructions. Shoe makers sometimes give their own limit; if it is lower, use the lower figure.
5. Mirror the other shoe
Measure from the tip of each shoe to the cleat, and compare the angles from below. Unless your feet differ, both sides should match.
Notes for 2-bolt and road cleats
SPD and Crankbrothers: the cleat should sit recessed in the tread. If the pedal body hits rubber before the cleat engages, add a shim from cleat hardware. Crankbrothers Standard cleats release at 15° or 20° depending on which foot you fit them to.
Road cleats: the slotted holes give more fore-aft and rotation range than SPD. The cleat color sets the float, so fit the color you want before you fine-tune.
Templates and wedges: alignment tools and forefoot wedges are in cleat fitment.
First test before you ride in traffic
Check the setup on a trainer, or with the bike against a wall, before any real ride.
Set the release tension to its lowest setting on both pedals.
Clip in and out 10 to 20 times on each side. The cleat should click in cleanly and release at a similar heel angle on both feet.
Pedal for 10 minutes. Check that your heels clear the cranks and that your feet sit in the middle of the float.
Change one thing at a time in small steps, marking the old position first.
Take a short ride on quiet roads, then recheck the cleat bolts and pedal tightness.
New to clipping in? Practice the technique in how to clip in and out before your first proper ride.
When to adjust, and when to see a fitter
Small, persistent discomfort usually points to one setting. Use this as a starting point, not a diagnosis.
What you feel
Common cause
Try
Hot spots or numb toes
Cleat too far forward, or tight shoes
Move the cleat back slightly; loosen the shoe
Heel or ankle rubs the crank
Stance too narrow or heel angled in
Move the cleat toward the inside of the sole, or rotate it
Pain on the inside or outside of the knee
Cleat angle fighting your natural foot angle
Recheck rotation; try a cleat with more float
Clipping out by accident
Tension too low or worn cleats
Raise tension a little; replace worn cleats
Clicking or creaking
Loose cleat bolts or dry pedal threads
Re-torque the bolts; re-grease the threads
If pain lasts more than a few rides after small adjustments, see a professional bike fitter.
FAQ
Do you need to grease clipless pedal threads?
+
Yes. A thin film of grease stops the steel spindle corroding into the aluminum crank, helps the pedal tighten fully and prevents creaks. Use anti-seize instead for titanium spindles.
Do I need a torque wrench to install pedals and cleats?
+
It helps but is not essential for pedals: 35–55 N·m (Shimano's range) is a firm push on a full-length pedal wrench. A small torque driver is more useful for cleat bolts, because 5–6 N·m is easy to overshoot and small bolts strip.
Why can't I clip in after fitting new cleats?
+
On 2-bolt shoes the usual causes are a sole cover plate left in place or tread that stands taller than the cleat, so the pedal body hits rubber before the cleat engages; a cleat shim fixes that. Also check the cleat is the right way round and the release tension is not wound right up.
Should both cleats be in the same position?
+
Start with them mirrored, measured from the toe of each shoe. Change one side only if your feet differ, for example one foot naturally points out further, and make small changes one at a time.
How often should I check cleat bolts?
+
After the first ride, then every few weeks. A loose cleat rotates with your shoe, which makes release unpredictable. Replace cleats when they show wear; see when to replace cleats.